Using the pipeline presents us with one little problem. While it flawlessly calculates the screen location of 3D vertices, it does not show depth. You will see exactly what I mean by this in a minute. The problem is that Direct3D draws over all images when drawing (whether or not that image was closer or not). So far, we have only worked with one triangle, and so you haven't had a chance to see this in action.
This lesson will go over the anatomy of this problem, and a good way to fix it.
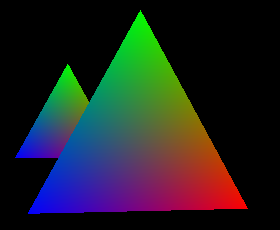
Let's say we wanted to draw two triangles, one behind the other, and then view them from an angle where the farther triangle was partially behind the other. If we did this with what code we've covered so far, this is how that might look:

Defying the Laws of PhysicsThis, unfortunately, defies the laws of physics. Things that are farther do not usually appear in front of closer things, especially when the closer thing is blocking it. The way it should appear is like this:
Obeying the LawWhen a model is rendered, several things happen. First, Direct3D calls up the pipeline you built. It is all neatly packed away in memory. Direct3D takes this and processes each model, one at a time, into a 2D image. Immediately after creating that image, it is drawn to the back buffer.
After the first image has been drawn to the screen, the next model is taken up, processed, and drawn to the back buffer. However, no matter where the model was placed in 3D space, the second image is shown over the first one, and you get the result shown in the first image.
Fortunately, Direct3D provides an easy solution to this. The solution is known as a Z-Buffer.
A Z-Buffer, also known as a depth buffer, is simply a large buffer that keeps track of the distance from the camera of every pixel on the screen. This is illustrated in the following image.
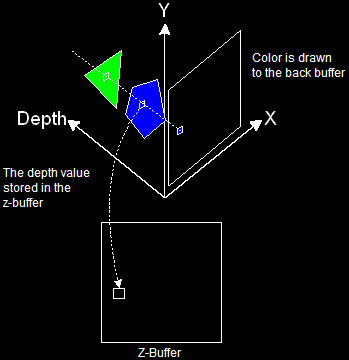
The Z-Buffer (Or Depth Buffer)This diagram shows how a z-buffer works. Whenever a pixel is drawn, it takes the closest pixel to the camera and draws that on the back buffer. At the same time, it stores the depth value into the same spot in the z-buffer, so that the next time something is drawn, Direct3D can see how close each pixel is, and which objects should be drawn and which should not.
Now that you understand the concept of a z-buffer, let's go over how to implement the z-buffer into your game.
I'm going to dive right in. There are three key steps to Z-Buffering.
1. Setting the Appropriate Presentation Parameters
2. Turning On Z-Buffering
3. Clearing the Z-Buffer
Each of these steps are very simple. Let's go over them now.
This first step takes us all the way back to the first few lines of Direct3D we run. We only add two lines of code to this, and make no further changes. I'll show you the changes, then explain what they do. As usual, changes are in bold.
D3DPRESENT_PARAMETERS d3dpp;
ZeroMemory(&d3dpp, sizeof(d3dpp));
d3dpp.Windowed = FALSE;
d3dpp.SwapEffect = D3DSWAPEFFECT_DISCARD;
d3dpp.hDeviceWindow = hWnd;
d3dpp.BackBufferFormat = D3DFMT_X8R8G8B8;
d3dpp.BackBufferWidth = SCREEN_WIDTH;
d3dpp.BackBufferHeight = SCREEN_HEIGHT;
d3dpp.EnableAutoDepthStencil = TRUE;
d3dpp.AutoDepthStencilFormat = D3DFMT_D16;
Let's go over what these do.
In truth, z-buffering can be complex. Setting this value to TRUE tells Direct3D to automatically create the z-buffer and set it up in a way used most often. There are, of course, uses for the complex method, but we'll stick to simple for now. We'll cover ways the complex method can be useful later in the tutorial.
This is the format for each pixel in the z-buffer. We don't use the regular pixel format defined in the Presentation Parameters. Instead, we use a special format for z-buffers. This format is D3DFMT_D16. This means that each pixel is 16-bit. There are other formats, but we will not need them for the extent of this tutorial.
This one is quite simple. We have just one function to call, with two simple parameters.
If you did the last lesson, you might recall using the SetRenderState() function. Well, we're going to use it again, meaning two calls will be made. Here is what we now have:
d3ddev->SetRenderState(D3DRS_LIGHTING, FALSE); // turn off the 3D lighting
d3ddev->SetRenderState(D3DRS_ZENABLE, TRUE); // turn on the z-buffer
This time we set the first parameter to D3DRS_ZENABLE, which enables z-buffering. We could, of course, set it to FALSE, but this would turn the z-buffering off, which would not be desirable.
This also takes just one function, and this function is also one you have seen before, and are therefore using twice. This function is the Clear() function.
Previously, you used this function to clear the back buffer, like so:
d3ddev->Clear(0, NULL, D3DCLEAR_TARGET, D3DCOLOR_XRGB(0, 0, 0), 1.0f, 0);
This cleared the back buffer to black. Well, we also want to clear the z-buffer, so we change one parameter and do this:
d3ddev->Clear(0, NULL, D3DCLEAR_TARGET, D3DCOLOR_XRGB(0, 0, 0), 1.0f, 0);
d3ddev->Clear(0, NULL, D3DCLEAR_ZBUFFER, D3DCOLOR_XRGB(0, 0, 0), 1.0f, 0);
The only change here being that the D3DCLEAR_TARGET was changed to D3DCLEAR_ZBUFFER. Simple.
Notice that the color is still there. When clearing a z-buffer, the Clear() function uses the parameter after the color. This is 1.0f, which is the "farthest" a depth buffer can be.
And now let's look at the final program. In addition to adding z-buffering, I changed a few things in the pipeline, because this program does not rotate a single triangle, but shows two identical rotating triangles, one right behind the other. These changes are not bolded. If you have not yet mastered matrices, it might be a good idea to study the new pipeline code in addition to the bold buffer code, to see how this works.
[
Main.cpp]
// include the basic windows header files and the Direct3D header file
#include <windows.h>
#include <windowsx.h>
#include <d3d9.h>
#include <d3dx9.h>
// define the screen resolution
#define SCREEN_WIDTH 800
#define SCREEN_HEIGHT 600
// include the Direct3D Library files
#pragma comment (lib, "d3d9.lib")
#pragma comment (lib, "d3dx9.lib")
// global declarations
LPDIRECT3D9 d3d; // the pointer to our Direct3D interface
LPDIRECT3DDEVICE9 d3ddev; // the pointer to the device class
LPDIRECT3DVERTEXBUFFER9 v_buffer = NULL; // the pointer to the vertex buffer
// function prototypes
void initD3D(HWND hWnd); // sets up and initializes Direct3D
void render_frame(void); // renders a single frame
void cleanD3D(void); // closes Direct3D and releases memory
void init_graphics(void); // 3D declarations
struct CUSTOMVERTEX {FLOAT X, Y, Z; DWORD COLOR;};
#define CUSTOMFVF (D3DFVF_XYZ | D3DFVF_DIFFUSE)
// the WindowProc function prototype
LRESULT CALLBACK WindowProc(HWND hWnd, UINT message, WPARAM wParam, LPARAM lParam);
// the entry point for any Windows program
int WINAPI WinMain(HINSTANCE hInstance,
HINSTANCE hPrevInstance,
LPSTR lpCmdLine,
int nCmdShow)
{
HWND hWnd;
WNDCLASSEX wc;
ZeroMemory(&wc, sizeof(WNDCLASSEX));
wc.cbSize = sizeof(WNDCLASSEX);
wc.style = CS_HREDRAW | CS_VREDRAW;
wc.lpfnWndProc = WindowProc;
wc.hInstance = hInstance;
wc.hCursor = LoadCursor(NULL, IDC_ARROW);
wc.lpszClassName = L"WindowClass";
RegisterClassEx(&wc);
hWnd = CreateWindowEx(NULL, L"WindowClass", L"Our Direct3D Program",
WS_OVERLAPPEDWINDOW, 0, 0, SCREEN_WIDTH, SCREEN_HEIGHT,
NULL, NULL, hInstance, NULL);
ShowWindow(hWnd, nCmdShow);
// set up and initialize Direct3D
initD3D(hWnd);
// enter the main loop:
MSG msg;
while(TRUE)
{
while(PeekMessage(&msg, NULL, 0, 0, PM_REMOVE))
{
TranslateMessage(&msg);
DispatchMessage(&msg);
}
if(msg.message == WM_QUIT)
break;
render_frame();
}
// clean up DirectX and COM
cleanD3D();
return msg.wParam;
}
// this is the main message handler for the program
LRESULT CALLBACK WindowProc(HWND hWnd, UINT message, WPARAM wParam, LPARAM lParam)
{
switch(message)
{
case WM_DESTROY:
{
PostQuitMessage(0);
return 0;
} break;
}
return DefWindowProc (hWnd, message, wParam, lParam);
}
// this function initializes and prepares Direct3D for use
void initD3D(HWND hWnd)
{
d3d = Direct3DCreate9(D3D_SDK_VERSION);
D3DPRESENT_PARAMETERS d3dpp;
ZeroMemory(&d3dpp, sizeof(d3dpp));
d3dpp.Windowed = TRUE;
d3dpp.SwapEffect = D3DSWAPEFFECT_DISCARD;
d3dpp.hDeviceWindow = hWnd;
d3dpp.BackBufferFormat = D3DFMT_X8R8G8B8;
d3dpp.BackBufferWidth = SCREEN_WIDTH;
d3dpp.BackBufferHeight = SCREEN_HEIGHT;
d3dpp.EnableAutoDepthStencil = TRUE; // automatically run the z-buffer for us
d3dpp.AutoDepthStencilFormat = D3DFMT_D16; // 16-bit pixel format for the z-buffer
// create a device class using this information and the info from the d3dpp stuct
d3d->CreateDevice(D3DADAPTER_DEFAULT,
D3DDEVTYPE_HAL,
hWnd,
D3DCREATE_SOFTWARE_VERTEXPROCESSING,
&d3dpp,
&d3ddev);
init_graphics(); // call the function to initialize the triangle
d3ddev->SetRenderState(D3DRS_LIGHTING, FALSE); // turn off the 3D lighting
d3ddev->SetRenderState(D3DRS_CULLMODE, D3DCULL_NONE); // both sides of the triangles
d3ddev->SetRenderState(D3DRS_ZENABLE, TRUE); // turn on the z-buffer
}
// this is the function used to render a single frame
void render_frame(void)
{
d3ddev->Clear(0, NULL, D3DCLEAR_TARGET, D3DCOLOR_XRGB(0, 0, 0), 1.0f, 0);
d3ddev->Clear(0, NULL, D3DCLEAR_ZBUFFER, D3DCOLOR_XRGB(0, 0, 0), 1.0f, 0);
d3ddev->BeginScene();
// select which vertex format we are using
d3ddev->SetFVF(CUSTOMFVF);
// set the view transform
D3DXMATRIX matView; // the view transform matrix
D3DXMatrixLookAtLH(&matView,
&D3DXVECTOR3 (0.0f, 0.0f, 15.0f), // the camera position
&D3DXVECTOR3 (0.0f, 0.0f, 0.0f), // the look-at position
&D3DXVECTOR3 (0.0f, 1.0f, 0.0f)); // the up direction
d3ddev->SetTransform(D3DTS_VIEW, &matView); // set the view transform to matView
// set the projection transform
D3DXMATRIX matProjection; // the projection transform matrix
D3DXMatrixPerspectiveFovLH(&matProjection,
D3DXToRadian(45), // the horizontal field of view
(FLOAT)SCREEN_WIDTH / (FLOAT)SCREEN_HEIGHT, // aspect ratio
1.0f, // the near view-plane
100.0f); // the far view-plane
d3ddev->SetTransform(D3DTS_PROJECTION, &matProjection); // set the projection
// select the vertex buffer to display
d3ddev->SetStreamSource(0, v_buffer, 0, sizeof(CUSTOMVERTEX));
D3DXMATRIX matTranslateA; // a matrix to store the translation for triangle A
D3DXMATRIX matTranslateB; // a matrix to store the translation for triangle B
D3DXMATRIX matRotateY; // a matrix to store the rotation for each triangle
static float index = 0.0f; index+=0.05f; // an ever-increasing float value
// build MULTIPLE matrices to translate the model and one to rotate
D3DXMatrixTranslation(&matTranslateA, 0.0f, 0.0f, 2.0f);
D3DXMatrixTranslation(&matTranslateB, 0.0f, 0.0f, -2.0f);
D3DXMatrixRotationY(&matRotateY, index); // the front side
// tell Direct3D about each world transform, and then draw another triangle
d3ddev->SetTransform(D3DTS_WORLD, &(matTranslateA * matRotateY));
d3ddev->DrawPrimitive(D3DPT_TRIANGLELIST, 0, 1);
d3ddev->SetTransform(D3DTS_WORLD, &(matTranslateB * matRotateY));
d3ddev->DrawPrimitive(D3DPT_TRIANGLELIST, 0, 1);
d3ddev->EndScene();
d3ddev->Present(NULL, NULL, NULL, NULL);
}
// this is the function that cleans up Direct3D and COM
void cleanD3D(void)
{
v_buffer->Release(); // close and release the vertex buffer
d3ddev->Release(); // close and release the 3D device
d3d->Release(); // close and release Direct3D
}
// this is the function that puts the 3D models into video RAM
void init_graphics(void)
{
// create the vertices using the CUSTOMVERTEX struct
CUSTOMVERTEX vertices[] =
{
{ 3.0f, -3.0f, 0.0f, D3DCOLOR_XRGB(0, 0, 255), },
{ 0.0f, 3.0f, 0.0f, D3DCOLOR_XRGB(0, 255, 0), },
{ -3.0f, -3.0f, 0.0f, D3DCOLOR_XRGB(255, 0, 0), },
};
// create a vertex buffer interface called v_buffer
d3ddev->CreateVertexBuffer(3*sizeof(CUSTOMVERTEX),
0,
CUSTOMFVF,
D3DPOOL_MANAGED,
&v_buffer,
NULL);
VOID* pVoid; // a void pointer
// lock v_buffer and load the vertices into it
v_buffer->Lock(0, 0, (void**)&pVoid, 0);
memcpy(pVoid, vertices, sizeof(vertices));
v_buffer->Unlock();
}
If you run this program, you'll get two triangles rotating around each other. This is a screenshot of what you'll get:
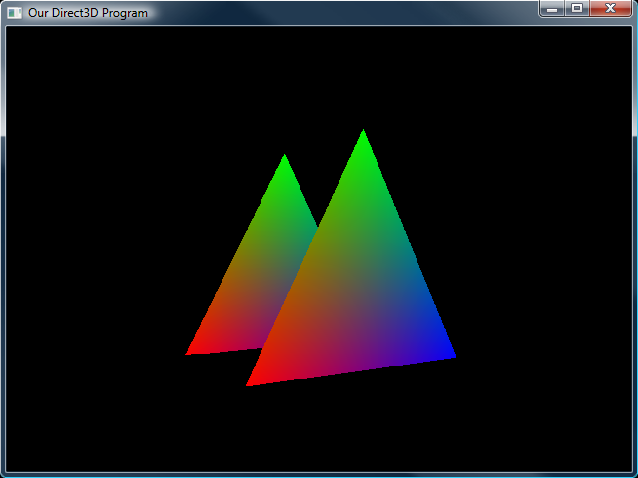
The Rotating Triangles Now we are getting somewhere! Next, we'll learn to apply textures to our primitives, as well as combine them to make shapes more interesting than mere triangles. This particular lesson does not have anything major to learn, but I'd suggest modifying the code until you are familiar with it, then doing these exercises:
1. See what happens when you turn z-buffering off
2. See what happens when you clear the z-buffer to 0.0f instead of 1.0f
3. Study and change around the new transform code to become familiar with how what was done
When you're done (or if you're skipping out), let's find out how to combine these triangles to make simple geometric shapes in actual 3D!
Next Lesson: Simple Modeling
GO! GO! GO!
© 2006-2026 DirectXTutorial.com. All Rights Reserved.
Expand